Moving WordPress to a new server is a very hassle work, If you are not using the correct method to transfer the WordPress site to New server, Your site may be broken or your link may not be working.
Today we will learn to move WordPress site to the new server in easy way without losing anything and without any downtime because when you change your nameservers to New Host it takes time 24 to 48 hours to resolving DNS completely and during this time your site may be down to various locations.
In this article, we will show you how to move WordPress Site without any downtime in a simple way.
How to transfer WordPress to new server without any downtime
A Step By Step Guide to Migrating Your WordPress Website to a New Web Host in an easy way
First, you need to buy another hosting where you want to move your site. After getting your hosting account, Don’t change nameservers pointing to our name servers yet .
Step 1: Back Up Your Website’s Files
You can backup your files via ftp, cpanel or ssh whichever is available. below is the process of backup via ftp.
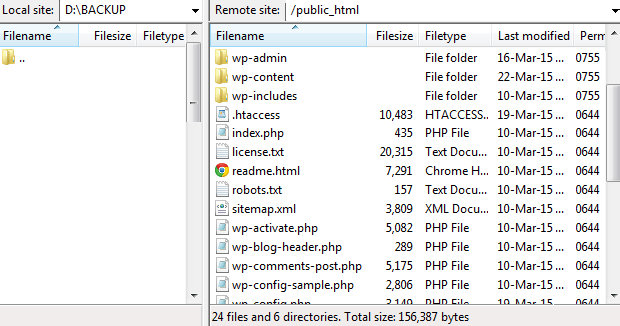
First, Backup all of your website file via FTP software like Filezilla which is free FTP program. If your WordPress installed in the root folder copy all of your files in public_html folder to your local computer. If your WordPress installed in subfolder or directory copy that directory to your local computer. This procedure takes times depending on the file sizes of your wp-content folder.
You can reduce the size of the backup by deleting unused themes and plugins before start transferring files. Copy files from Remote Site to Local Site.
While the file transfer is ongoing we can backup database.
Step 2: Export The WordPress Database
We discussed this step in our previous article How to make WordPress Database Backup. Login to your Cpanel and going to PHPMyAdmin under section Databases. Select your Database and Click on the tab Export. Select Method ‘Quick’ and format ‘SQL’ and click on the Go Button. Your Database will be downloaded to your local computer.
After the export the Database and files transfer, the next step is uploading both to the new server. You can reduce Database size before exporting it by Optimize the database.
Step 3: Create The WordPress Database On Your New Host Server
Now it’s the turn of uploading files and database to the new server. First we create the database on the new server and after that upload the files to the new server.
Login to your New Hosting Cpanel and under section Databases open the MySQL Database. Create the new Database and user. Always select strong password for the user. Add the user to the Database and Grant all privilege to the User.
Step 4: Import Your Database
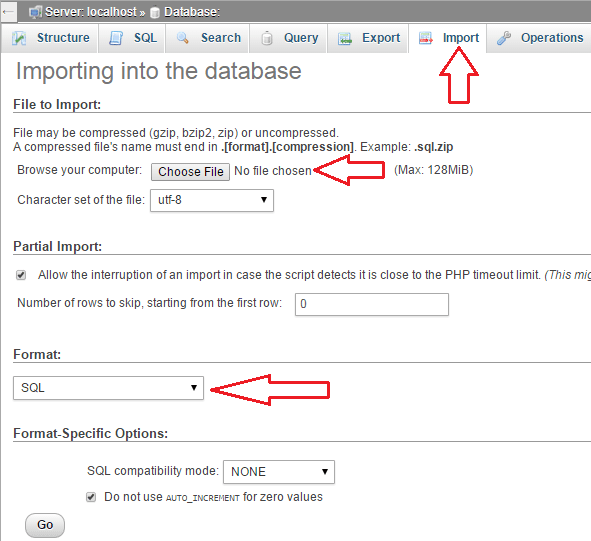
Now go to PHPMyAdmin and select the created Database. Click on the tab Import looks like the below image. Choose file which we export in the previous step. If your Database is not very large Uncheck box Partial Import. Choose format SQL because we export our database in SQL format and click Go.
After importing the database, you will get the success message.
Step 5: Edit wp-config.php file.
Before uploading the files to the new server, we edit the wp-config.php file with the new database credentials. This is very necessary to integrate the site with database otherwise we will get “Error Establishing a Database Connection”. Browse the file wp-config.php in Local Computer where we downloaded files in step 1. Copy this file to another folder for restoring if anything goes wrong. Now Open this file to edit and change the following:
/** The name of the database for WordPress */
define('DB_NAME', 'db_name');

/** MySQL database username */
define('DB_USER', 'db_user');

/** MySQL database password */
define('DB_PASSWORD', 'password');

/** MySQL hostname */
define('DB_HOST', 'localhost');
- Change database name with the new created Database name
- Change Username with the new created User Name
- Change DB Password with the new user password
- Change the Hostname if different, Some Hosting company like Godaddy use the different hostname instead of the local host.
After changing all, Save wp-config.php and close the file.
Step 6: Upload The WordPress Files To Your New Host
Connect new host via FTP client and upload all files to the new server. If your site is the root name upload it to the public_html folder. Make sure you upload the updated wp-config.php file to the new server.
Now your database and WordPress files are on the new server.
Step 7: Change your DNS
Change your DNS but not delete the site from the old server. Now your site is on both servers. DNS takes the 24 to 48 hours to resolving completely. During this time, your site is live without any downtime. After 48 hours, you can delete the old site.
Troubleshooting:
If you use W3 Total Cache plugin, Flush the all cache by login to the new server WordPress admin Otherwise your site may be broken and media folder and images on the site are not showing.
If you change the domain, You need to change all URLs of your site. You can do it by changing site url at database wp-options table. For this login to phpmyadmin from Cpanel. Select the database and click on wp-options table. Change the site url at here. alternatively you can adding these files in the active theme’s function.php file.
update_option('siteurl','http://www.new-site-address.com');
update_option('home','http://www.new-site-address.com');
After adding the above line, Open the website front page. You need to do that because functions.php has to be executed at least once. After you run your site once and you make sure it works. After all is going well, You should delete inserted lines from your functions.php file. The Updated settings are already stored in your database and should not be modified each time your site is loaded.
Enjoy your New Host. If you feel any difficulty to change the host, Let us know your experience with the process in the comments box.