WordPress is most popular blogging plateform. It is easy to use for beginners who lack of tecnical and programming knowledge. The first thing is the hosting for installing wordpress. All of Netzole Hosting Plans have Softaculas One click WordPress Installer.
Click to choose your hosting package at attractive discount
After getting hosting package you required to login your control panel with your login details provided at Netzole Hosting Welcome mail. Netzole provides latest cpanel for its wordpress customer. Cpanel comes with Softaculous App Installer. Softaculous is easy way to install wordpress. Lets start with this tutorial for beginners. Below image provides snapshop of softaculous. Just click on wordpress icon.

On the next screen there are some changes and fill details just like below image. First change is choose protocol for your blog address. You can make it look like
http://www.yourdomain.com or
http://yourdomain.com
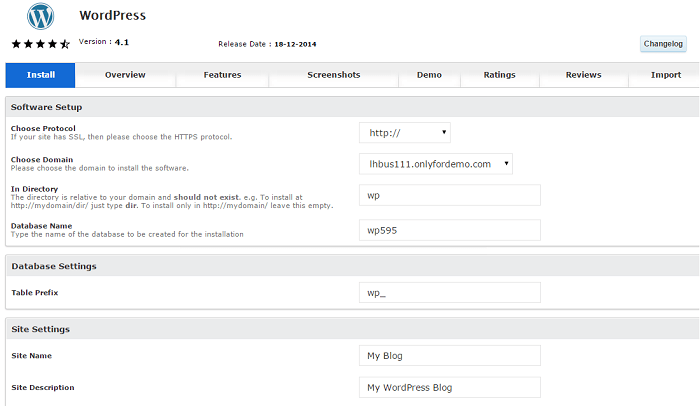
next option is ‘In Directory’ If you want to install wordpress in directory name it then your blog address is looks like https://netzole.com/blog, I recommend you to install wordpress in root, for this leave empty this option.
Database name and Setting – dont change this option its a name of your database where your blog data save.
Site Setting: Enter your blog name and some description about your site.
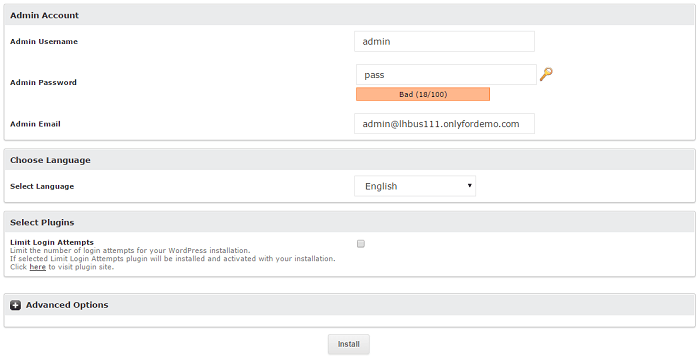
In Admin setting choose your admin username and password. Don’t choose default admin due to security issue. and finally click on ‘Install’ tab. Your WordPress is install and ready in less than 5 minutes to publish your first post.
How to Create WordPress Blog in 5 Minutes
Creating a WordPress blog in just 5 minutes is possible if you follow these steps. This guide assumes you already have a hosting provider and domain name. If you don’t, you’ll need to set those up first, which may take a bit longer than 5 minutes.
Step 1: Install WordPress
- Log in to your hosting provider’s control panel (e.g., cPanel).
- Look for the “WordPress” or “One-Click Install” option in your control panel. Many hosting providers offer one-click WordPress installations.
- Click on the WordPress installation option and follow the on-screen instructions to set up WordPress. You’ll need to choose the domain where you want to install WordPress, create an admin username and password, and provide an email address.
- Click “Install” or “Submit” to begin the installation process.
Step 2: Access Your WordPress Dashboard
Once the installation is complete, you’ll receive a confirmation message with a link to your WordPress dashboard. Click on the provided link, or you can typically access your dashboard by going to “yourdomain.com/wp-admin” and logging in with the admin credentials you created earlier.
Step 3: Configure Your Blog
Now that you’re in your WordPress dashboard, you can configure your blog settings:
- Choose a Theme: WordPress offers various free and premium themes. You can select one that suits your blog’s style and purpose by going to “Appearance” > “Themes.”
- Customize Your Blog: Customize your blog’s appearance and layout by going to “Appearance” > “Customize.” You can change colors, fonts, and other design elements.
- Create Essential Pages: At a minimum, create essential pages like “About,” “Contact,” and “Privacy Policy.” You can do this by going to “Pages” > “Add New.”
- Install Essential Plugins: Plugins add functionality to your blog. Consider installing plugins for SEO (e.g., Yoast SEO), social sharing (e.g., ShareThis), and spam protection (e.g., Akismet). Go to “Plugins” > “Add New” to search and install plugins.
Step 4: Write Your First Blog Post
- Go to “Posts” > “Add New” to create your first blog post.
- Add a title, write your content in the post editor, and format it using the provided tools.
- Insert images and multimedia if needed.
- Set a featured image (if your theme supports it).
- Choose relevant categories and tags to help organize your content.
- When you’re ready, click “Publish” to make your post live.
Step 5: Share Your Blog with the World
Congratulations! Your WordPress blog is now live. To share it with the world, promote your content on social media, engage with your audience, and continue creating valuable and engaging blog posts.
While you can create a basic WordPress blog in 5 minutes, remember that optimizing and customizing it, as well as creating and promoting quality content, will take more time. Building a successful blog is an ongoing process, but with dedication and effort, you can achieve your blogging goals.