XML-RPC functionality in WordPress provides a facility of posting remotely to blog, but it has a drawback that it can cause CPU and memory exhaustion and the site’s database to reach the maximum number of open connections. It is an open backdoor to attackers and spammers. So It is better that remove the XML-RPC when not in use for the performance boost and security purpose.
Here we will discuss all methods to protect and disable the xmlrpc.php file. This complete step by step guide to disable and protect xmlrpc.php in WordPress helps to secure and faster blog with saving server resources consuming by unexpected access to xmlrpc.php by bots, spammers, and hackers.
What is XML-RPC?
XML-RPC is a Remote Procedure Call (RPC) protocol, which uses XML to encode its calls and HTTP as a transport mechanism. In simple words, XML-RPC provides you a facility to posting directly to your blog from weblog clients and email apps. Like Windows Live Writer, Eudora, Thunderbird, etc. It also uses in receiving Pingbacks and trackbacks to your site from other blogs.
How to disable XML-RPC in WordPress
For Disabling the function of XML-RPC, Put this code into your theme funtion.php file or functionality plugin.
add_filter( 'xmlrpc_enabled', '__return_false' );
There are a lot of benefits of adding this code to functionality plugin instead of a theme funtion.php file.If you change the theme, you have to put code again into the new theme’s function.php file. If you put this code into the functionality plugin, there is no need to put again while changing the theme.
But if you check the header response, there is a link to XML-RPC.
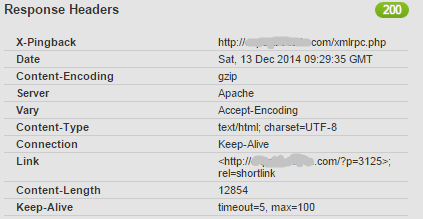
You can remove this link from header response by adding the following code into functionality plugin.
add_filter( 'wp_headers', 'yourprefix_remove_x_pingback' );
function yourprefix_remove_x_pingback($headers){
unset( $headers['X-Pingback'] );
return $headers;
}
Protect xmlrpc.php
You can protect xmlrpc.php file by adding this code.
<IfModule mod_alias.c>
RedirectMatch 403 /xmlrpc.php
</IfModule>
For checking the above code is working, try accessing the xmlrpc.php” file in your browser. you will get “403 – Forbidden message”. If you will get a 404 error page instead of 403, Add the following line to the .htaccess file above the “# BEGIN WordPress” tag
ErrorDocument 403 default
If you want to redirect xmlrpc.php to your custom page you can add the following code to the .htaccess file.
<IfModule mod_alias.c>
Redirect 301 /xmlrpc.php http://yourdomain.com/custom-page.php
</IfModule>
Denied requests to xmlrpc.php
You can deny all access to XML-RPC completely by adding these lines to your .htaccess file. For this, Login to your Control panel and go to File manager. Open .htaccess file and add following lines to .htaccess file.
<Files xmlrpc.php>
order deny,allow
deny from all
</Files>
This code completely denies all the request to xmlrpc.php. You can allow access to xmlrpc.php from specific IP by adding this:
<Files xmlrpc.php>
order deny,allow
deny from all
allow from <IP>
allow from <IP>
</Files>
Now your WordPress blog is protected from the remote access via xmlrpc.php.
Disable xmlrpc via plugin
You can disable xmlrpc request by using the disable xmlrpc plugin.
You can follow the following steps if use plugin:
- Install disable xmlrpc plugin plugins from WordPress Repository
- Activate Plugin and all done.
This plugin does not have any setting page. It disable only request to xmlrpc server. Default xmlrpc.php page is accessible after activating the plugin.